Maven安装(3.6.3版本)
本文介绍如何安装Maven-3.6.3版本
前言:Maven是Apache组织下的一个项目管理工具,用来对Java项目的创建、开发进行管理,提供帮助。Maven的作用,一是提供jar包的远程仓库下载,免去传统Java项目需要在项目里手动添加jar包的麻烦;二是提供了一些开发、测试、部署用的插件;三是支持Java项目的模块化开发。
Maven遵循“约定大于配置”的思想,其对于一些没有指定值的配置,选择使用默认值,这个默认值就是“约定”,比如默认src\main\java目录中存放开发代码,默认src\main\resources目录中存放项目资源文件。使用约定大于配置的思想可以减少很多配置,简化代码实现。
安装Maven前请先确保安装了JDK。这里我选择的Maven版本为3.6.3,JDK版本为8。需要注意的是,如果用IDEA创建Maven项目,导入Maven依赖时,可能会出现Maven版本跟IDEA版本对不上的问题,建议安装3.5.x版本的Maven。
1. 下载
官网下载:Index of /dist/maven/maven-3 (apache.org)
CNNIC镜像网站:Index of /apache/maven/maven-3 (cnnic.cn)
清华大学镜像网站:Index of /apache/maven/maven-3 (tsinghua.edu.cn)
官网的下载速度挺快的,可以直接从官网下载:


2. 安装
将下载的.zip文件直接解压,配置好即可食用。
这里我选择解压到D:\Environments\apache-maven-3.6.3

3. 配置
这里提一下,有些安装教程中,Maven的环境变量名为M2_HOME,有些则为MAVEN_HOME,实际上并没有什么区别,只是命名习惯不同,前者是Maven 2的命名习惯,后者是Maven 1的命名习惯。
配置MAVEN_HOME
新建环境变量,变量名为
MAVEN_HOME,变量值为Maven目录,这里我的是D:\Environments\apache-maven-3.6.3
配置Path
在Path环境变量中新增
%MAVEN_HOME%\bin。
配置Maven仓库
本地仓库:Maven需要将下载的jar包在本地进行存放,存放的位置会在conf目录下的
settings.xml文件中进行配置,因此先在Maven目录下创建一个目录repository(或者其他方便管理的目录下创建)用来存放下载的jar包。远程仓库:Maven需要从远程仓库中下载jar包到本地,但是其默认的远程仓库地址下载速度较慢,一般会将远程仓库更换为国内的阿里云镜像仓库或其他国内镜像仓库。
常用的国内镜像仓库地址配置如下:
阿里云:
1
2
3
4
5
6<mirror>
<id>aliyunmaven</id>
<mirrorOf>*</mirrorOf>
<name>阿里云公共仓库</name>
<url>https://maven.aliyun.com/repository/public</url>
</mirror>华为云:
1
2
3
4
5
6<mirror>
<id>huaweicloud</id>
<mirrorOf>*</mirrorOf>
<name>华为云仓库</name>
<url>https://repo.huaweicloud.com/repository/maven/</url>
</mirror>Maven中央仓库1:
1
2
3
4
5
6<mirror>
<id>repo1</id>
<mirrorOf>*</mirrorOf>
<name>repo1</name>
<url>https://repo1.maven.org/maven2</url>
</mirror>Maven中央仓库2:
1
2
3
4
5
6<mirror>
<id>repo2</id>
<mirrorOf>*</mirrorOf>
<name>repo2</name>
<url>https://repo2.maven.org/maven2</url>
</mirror>添加仓库配置
打开Maven目录下的conf目录下的
settings.xml文件。添加本地仓库配置:复制注释中的
<localRepository>/path/to/local/repo</localRepository>,并更换为本地仓库地址。

添加远程仓库设置:
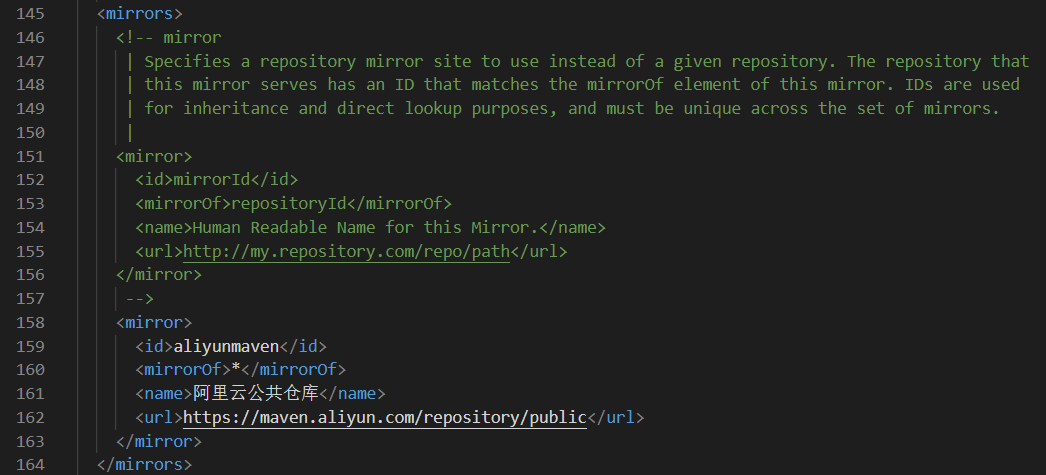
添加单个远程仓库,只需要在
<mirrors></mirrors>标签中添加远程仓库的配置即可,添加多个镜像配置不会让多仓库配置生效,只会取第一个仓库的配置。
添加多个远程仓库(推荐),则需要在
<profiles></profiles>中进行配置。首先在
<profile></profile>内配置,然后再在<activeProfiles></activeProfiles>中激活配置。这里直接附上添加多个远程仓库后的配置:
方式一:多个profile,每个profile一个repository。
1
2
3
4
5
6
7
8
9
10
11
12
13
14
15
16
17
18
19
20
21
22
23
24
25
26
27
28
29
30
31
32
33
34
35
36
37
38
39
40
41
42
43
44
45
46
47
48
49
50
51
52
53
54
55
56
57
58
59
60
61
62
63
64
65
66
67
68
69
70
71
72
73
74
75
76
77
78
79
80
81
82
83
84
85
86
87
88
<settings
xmlns="http://maven.apache.org/SETTINGS/1.0.0"
xmlns:xsi="http://www.w3.org/2001/XMLSchema-instance"
xsi:schemaLocation="http://maven.apache.org/SETTINGS/1.0.0 http://maven.apache.org/xsd/settings-1.0.0.xsd">
<localRepository>D:\Environments\apache-maven-3.6.3\repository</localRepository>
<pluginGroups></pluginGroups>
<proxies></proxies>
<servers></servers>
<mirrors></mirrors>
<profiles>
<profile>
<id>aliyun</id>
<repositories>
<repository>
<id>aliyun</id>
<url>https://maven.aliyun.com/repository/public</url>
<releases>
<enabled>true</enabled>
</releases>
<snapshots>
<enabled>true</enabled>
<updatePolicy>always</updatePolicy>
</snapshots>
</repository>
</repositories>
</profile>
<profile>
<id>huaweicloud</id>
<repositories>
<repository>
<id>huaweicloud</id>
<url>https://repo.huaweicloud.com/repository/maven/</url>
<releases>
<enabled>true</enabled>
</releases>
<snapshots>
<enabled>true</enabled>
<updatePolicy>always</updatePolicy>
</snapshots>
</repository>
</repositories>
</profile>
<profile>
<id>repo1</id>
<repositories>
<repository>
<id>repo1</id>
<url>https://repo1.maven.org/maven2</url>
<releases>
<enabled>true</enabled>
</releases>
<snapshots>
<enabled>true</enabled>
<updatePolicy>always</updatePolicy>
</snapshots>
</repository>
</repositories>
</profile>
<profile>
<id>repo2</id>
<repositories>
<repository>
<id>repo2</id>
<url>https://repo2.maven.org/maven2</url>
<releases>
<enabled>true</enabled>
</releases>
<snapshots>
<enabled>true</enabled>
<updatePolicy>always</updatePolicy>
</snapshots>
</repository>
</repositories>
</profile>
</profiles>
<activeProfiles>
<activeProfile>aliyun</activeProfile>
<activeProfile>huaweicloud</activeProfile>
<activeProfile>repo1</activeProfile>
<activeProfile>repo2</activeProfile>
</activeProfiles>
</settings>方式二:一个profile,多个repository。
1
2
3
4
5
6
7
8
9
10
11
12
13
14
15
16
17
18
19
20
21
22
23
24
25
26
27
28
29
30
31
32
33
34
35
36
37
38
39
40
41
42
43
44
45
46
47
48
49
50
51
52
53
54
55
56
57
58
59
60
61
62
63
64
65
66
67
68
69
<settings
xmlns="http://maven.apache.org/SETTINGS/1.0.0"
xmlns:xsi="http://www.w3.org/2001/XMLSchema-instance"
xsi:schemaLocation="http://maven.apache.org/SETTINGS/1.0.0 http://maven.apache.org/xsd/settings-1.0.0.xsd">
<localRepository>D:\Environments\apache-maven-3.6.3\repository</localRepository>
<pluginGroups></pluginGroups>
<proxies></proxies>
<servers></servers>
<mirrors></mirrors>
<profiles>
<profile>
<id>nexus</id>
<repositories>
<repository>
<id>aliyun</id>
<url>https://maven.aliyun.com/repository/public</url>
<releases>
<enabled>true</enabled>
</releases>
<snapshots>
<enabled>true</enabled>
<updatePolicy>always</updatePolicy>
</snapshots>
</repository>
<repository>
<id>huaweicloud</id>
<url>https://repo.huaweicloud.com/repository/maven/</url>
<releases>
<enabled>true</enabled>
</releases>
<snapshots>
<enabled>true</enabled>
<updatePolicy>always</updatePolicy>
</snapshots>
</repository>
<repository>
<id>repo1</id>
<url>https://repo1.maven.org/maven2</url>
<releases>
<enabled>true</enabled>
</releases>
<snapshots>
<enabled>true</enabled>
<updatePolicy>always</updatePolicy>
</snapshots>
</repository>
<repository>
<id>repo2</id>
<url>https://repo2.maven.org/maven2</url>
<releases>
<enabled>true</enabled>
</releases>
<snapshots>
<enabled>true</enabled>
<updatePolicy>always</updatePolicy>
</snapshots>
</repository>
</repositories>
</profile>
</profiles>
<activeProfiles>
<activeProfile>nexus</activeProfile>
</activeProfiles>
</settings>
4. 测试
按Win+R键,输入cmd,打开命令行窗口,输入mvn -v,若可以查看到Maven版本,则说明安装配置成功。

5. IDEA创建Maven项目
修改Maven路径
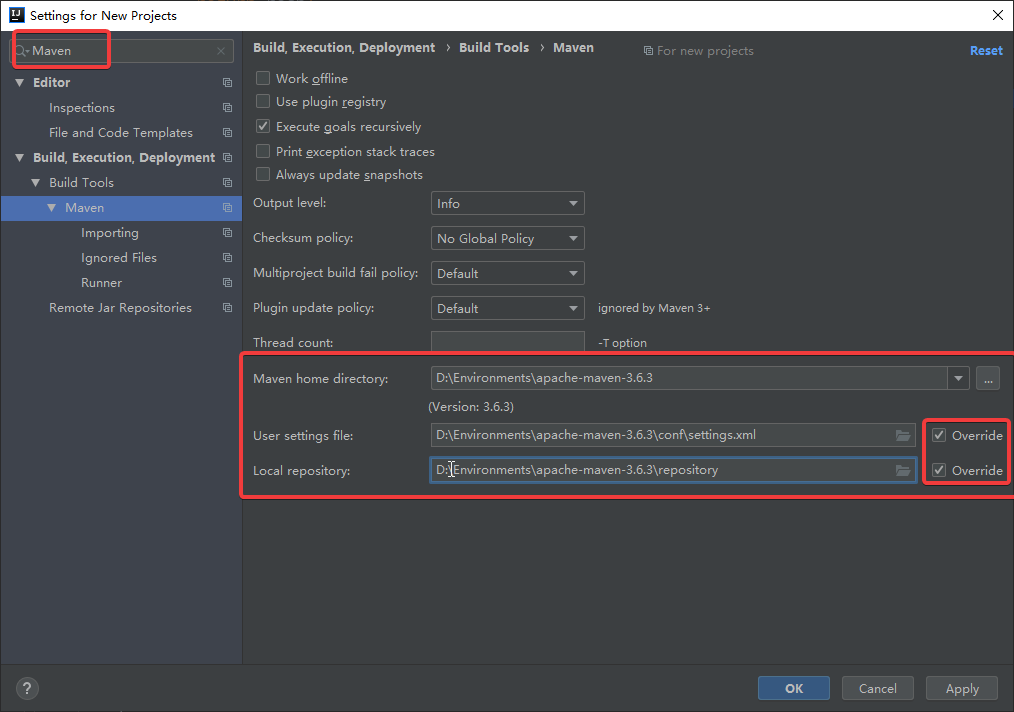
现在(2022年09月07日)进行Java开发大多数使用的都是IntelliJ IDEA,可以方便地创建Maven项目。需要注意的是,IDEA默认使用的是自带的Maven,其本地仓库的默认路径在C盘,使用久了下载的jar包会占据C盘资源,因此在创建Maven项目之前最好先把Maven换成自己的配置。
更改Maven路径:File–>Other Settings–>Settings for New Projects
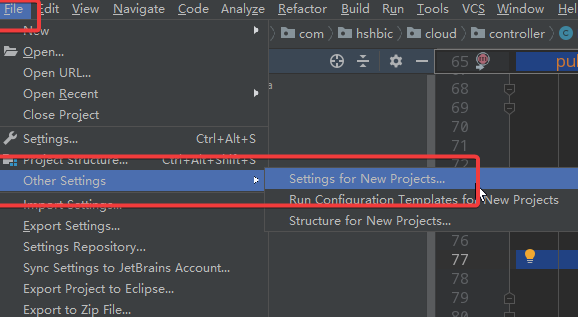
有些教程会说在Settings里面更高Maven路径,但在那里更改的路径只对当前项目起效,之后再创建新的Maven项目用的还是IDEA自己的Maven,因此这里我们直接修改创建新项目时的配置,再去创建Maven项目。
创建Maven项目
File–>New–>Project
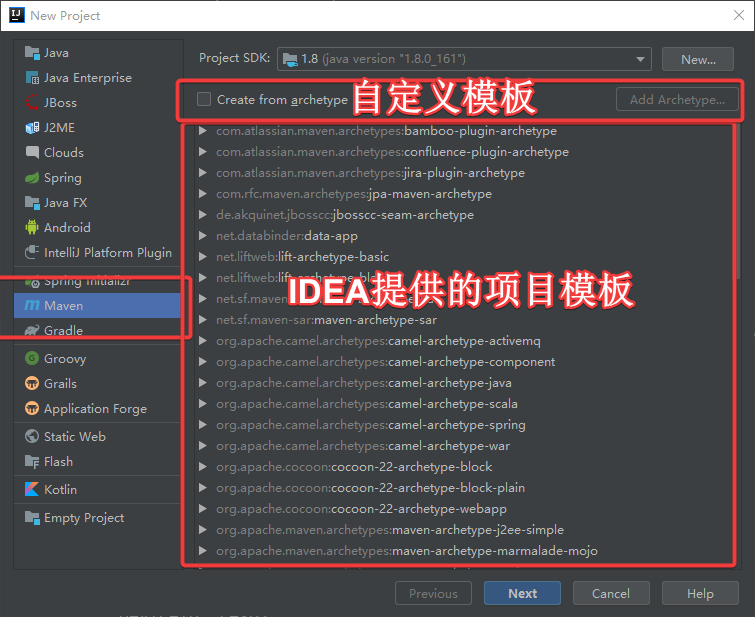
填写GAV。
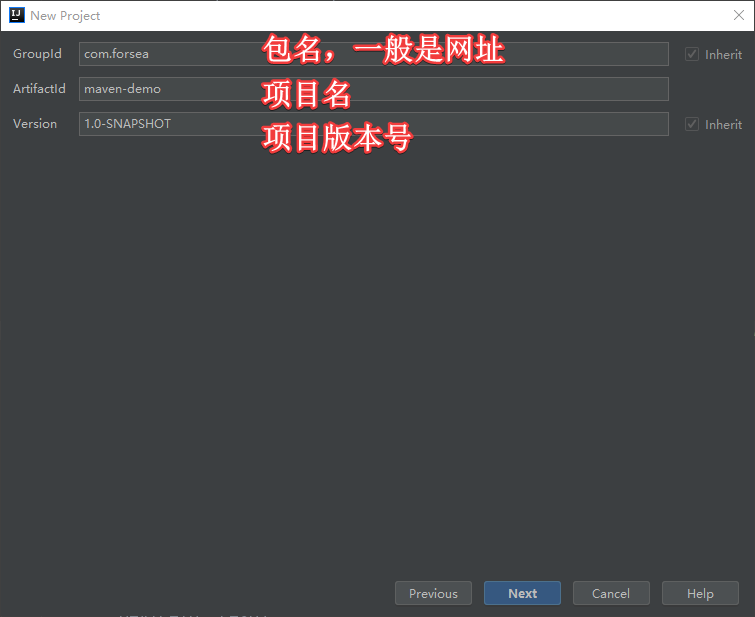
填写项目名,确认项目创建位置,Finish。

创建完毕

6. 卸载
卸载直接删除Maven文件夹,并清理掉相关环境变量即可。